Saturday, May 26, 2012

Kusudama flowers

I have had these brightly coloured Post-It's for a long time...

It is time they finally had a life other than in their little sticky-note pile

So I have been making Kusudama flowers like a mad woman... Well, I used up all the blue papers that I had, and now I am slowly moving onto the pink, green and orange that were also in the pile... (and eyeing some new post-it's in the office section at Walmart)

If you want a great Tutorial on these flowers... Head over to Folding Trees.  But if you are ok with my mediocre photos... Here they are:  (also, I will try to get the finished flower pictures up... my iPhone is not being cooperative at the moment)

Take your post-it and fold it in half from corner to corner


From the folded bottom side, fold the corners in, so that they match up with the top of the triangle

Take the flaps you just folded, and fold them in half, so they point back outwards

Then, you need to separate the inside of the "wing" so that you can press the center of  the wing down. Each "wing" will look like a kite.

Then you fold the top part of the "kite" down, so it is level with the rest of the paper triangle

Now you fold the kite's back in half

You need to do this five times for one flower... I made five flowers, out of my blue post-It's

Put some glue onto one edge...

And press the edges together (just don't crease the back part of the flower)

And then you have one petal...
 I will try and get the finished flower pics up ASAP, and link them here...
To make the stem of the flower, take some wire (i used 22 gage because it is what I had). and Then put some hot glue on the inside of the petal, and press it onto the wire.. Fill in with 4 more petals, and then wrap the wire in floral tape, and you have some Kusudama flowers for a bouquet.

Also, I made some paper Carnations too, if you want to check them out.

Thursday, May 24, 2012

Paper Flowers everywhere


I have been pretty crafty lately...

I finally feel creative again...

Like the giant crushing weight of my old job is no longer crushing my will to live...

(now I just need to find a new job)... (but I'm happy again, and I don't think I have been for a long time now)

My grandma.... (my Dad's mom) is an amazing gardener, and we both love Lilies. So when her sister died a few weeks ago, rather than buy her some cut flowers that would die after a couple weeks, I bought her some Lily bulbs for her garden. Last time I visited her, she gave me a Stargazer bulb, so I tried to find some of those for her but they were all sold out. I bought "Royal Sunset" and kept a few of the bulbs for myself too... I can't wait to see them.
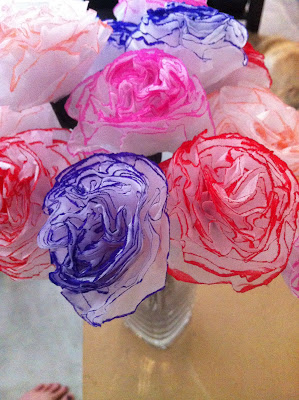
ANYWAY... I made some paper Lilies, but they didn't look great, so I ended up making my grandma a bouquet of Paper carnations (her favourite cut flower)


They were super easy!!!
Buy some tissue paper (It is like $1 for a package at walmart or the dollarstore)
Cut out into MANY circles (you want about 10-12 tissue paper circles per flower)
Colour the edges of the circles with a contrasting marker. I used the awesome smelly markers - Mr. Sketch. My favourite was the purple ones... Also the best smelling too!


Get some floral wire (or other kind of wire will work too)
Poke the wire up through the bottom of your circles, and then down (thought another hole) and wrap the wire around itself.
Now you take the first paper and crumple it up, and continue with the layers until you have your carnation.
Wrap the stem with floral tape... making the top of the wire and bottom of the flower look more realistic (look at pictures of carnations... or real ones if you need inspiration)

And then make it into a bouquet to give to someone you love too

I had so much fun making these, that I made a second bouquet, just of the purple ones for my other grandma for mother's day.  And I will make some for my own  house just as soon as I go pick up more tissue paper.


Here is the tutorial I used to make mine... and She explains it much more eloquently that I ever could...

Monday, May 14, 2012

Butternut Squash Ravioli (homemade)


Remember a few days ago, when I wrote about my homemade Pasta??

I made homemade ravioli too

Butternut Squash and Cheese stuffed into homemade Pasta


I realize that Butternut Squash is more of a Fall food... And roasting veggies in the oven on a really hot day, doesn't make a whole lot of sense... But I REALLY wanted to try making Ravioli, and I really wanted that Ravioli to be Butternut Squash.

I didn't really use a recipe for the filling. Here is what I did:

Roasted one Squash (cut up into pieces, lightly coated in oil, and baked until nice and tender)


Mashed up Squash - LET COOL UNTIL ROOM TEMPERATURE (or else the cheese will melt)

Added in a bunch of cheese (just plain marble, because that is what we had)

I might have added some parmasean too, because I did splurge on the fresh stuff for my homemade pasta.

Added some fresh cut up parsley and Salt and pepper until everything tasted good

Most of the recipes I read when I got the crazy idea in my head, all called for Nutmeg... But I specifically skipped that to make this less of a fall-feeling dish (since it is Spring! finally!)  But basically I just added  stuff until it all tasted great!

I rolled my pasta out to the 5 or 6 thickness on my Pasta roller, trying to make the sheets pretty wide (almost the same width as the roller)...

laid the thin sheet on the counter...


plopped some of the filling I had made earlier and spaced them evenly apart


And then fold the sheet over itself. Use some water and your finger, or a pastry brush (however you roll) to wet the pasta so the two sheets will kind of glue together, and your filling will be there in a nice little package instead of exploding into your pot of boiling water.


Lay your finished ravioli on a WELL floured cookie sheet to dry (I didn't flour my sheet enough, and the filling kept sticking, because that part of the pasta had more moisture... just keep an eye on them... you can always dust the flour off, but once they stick, they usually break open)


The ravioli were DELICIOUS! I think that next time I am going to try Lobster ravioli!!


Its a lot of work, but it is worth it for a nice change from the everyday frozen or canned Ravioli.


We were too busy stuffing this in our faces to get a prepared picture... They are probably less photogenic AFTER cooking than they were sitting in the cookie sheet


Saturday, May 12, 2012

Homemade Pasta

My Parents got me the pasta attachment for my Kitchen aid for my birthday

I am so stoked about this

We used to have a pasta maker.. but it was this weird bread-machine like thing, and it more or less, just extruded the pasta out of a hole... Pretty cool because you could make macaroni and other hole-y pastas... But it was a bitch to clean... Like you could spend an hour making pasta, and then the next 2 days cleaning the thing. So it made the pasta not worth making, because it was a huge undertaking.

I always wanted one of the hand cranked ones, but I have never lived in a house with a counter that you could actually clamp it onto anything... AND I ALWAYS have and ALWAYS will, live in a house with Animals... And I don't thing anyone (including me) wants to eat cat-hair pasta.

But then I got a Kitchen Aid for Christmas 2 years ago

And they have pasta attachments

Swoon

super-expensive (at least for me) Pasta attachments

Less-of-a-Swoon

But My mom found these on sale and totally scored it for me, and so it was my birthday present!

SCORE


I have made homemade pasta exactly 100 times in the last three weeks. (that may be an exaggeration)

BUT if you haven't had Homemade Pasta.... get on it... you don't need the pasta attachment, it just make life so much more easy.... and your rolling pin might feel a little neglected.... but your pasta attachment will feel loved... you can make cinnamon buns with the rolling pin another time.

Did I seriously just type that? wow

ANYWAY, I have been using Chef John's "Homemades" Pasta recipe pretty much exclusively. I will try some other ones eventually, but for now, I stick to this one. It is easy, fun, and He has a video that you can watch to help guide you through it... I brought my laptop into the kitchen and tried to not get flour on it.


The only thing I changed in the recipe, was using less Flour.  So here it is:


Homemade Pasta

2 cups Flour (All Purpose)
2 large eggs  (I crack them into a bowl in-case I mess up and get shell in, but you can crack them right into the well you created in the flour)
1 teaspoon Salt
1 Tablespoon Olive Oil
1/3 cup Water


Clean your counter top really well, and then measure your flour into a pile
Make a well into the flour pile
Add the salt and the oil to the well, and then the eggs
using a fork, slowly whisk up the eggs
Pay attention to your edges and make sure there is not any weak spots... hold your other hand if you think the wall might give way.
Add in the water, and keep mixing.
Gradually (and carefully) add in more flour as you go
When the liquid starts to look more like a thick cake bater, you can ditch the fork, and just use your fingers
Mix everything until it is smooth and elastic. Add more flour if you need too


Let the dough rest for about half an hour... just put a bowl over top and let it sit there on the counter

Cut the rested dough into small pieces, and feed through the pasta roller, until it is at the thickness you want.

Let dry, for a few hours.... OR (if your like me) Boil some water and use all the little scrap pieces for a taste test...


Watch Chef John's video, He is much better at explaining these things than I am.


Thursday, May 10, 2012

Angel Food Cake (checked off the bucket list!)

This is my cat Ali... "Helping" make the Cake


Okay, so I have always wanted to make my own angel food cake...

(that is why it is on my kitchen bucket list)

So I finally did it.


It started when my mom and I finally found THE angel food cake pan that we had been dreaming about... For $2 at Value Village!

Then finally I went home with the recipe from Joy of Baking, my mom bought a ton of eggs, and cake flour, and I brought my Kitchen Aid...

and Ta-Da! Angel Food cake!!

We had grand plans of whipped cream and fresh strawberries on top of the cake, but it was gone before we could bother whipping cream.. Seriously... Its that good, it didn't need ANYTHING

And it was pretty fun. (With the kitchen aid) I don't know if it would be as awesome without the awesome power of the kitchen aid doing most of the work.

I also got to use my mom's clear vanilla that her friend brought home from Mexico... I want some of my own now!


Sift the flour and sugar together a few times so they be come one - Flugar? Sugour? I like the first one


My Kitchen Aid does most of the work in the kitchen... I wish she would do the dishes too

Stiff Peaks... Almost time to fold in the flugar

Pretty cake batter waves!

See the foot on the cake pan right there (bottom right)... That is what makes this THE cake pan we were searching for.

Ava wanted to try some cake too


Anyway, if you have a Kitchen aid (or other, super power mixer dealy)... and a super awesome Angel food cake pan... MAKE THIS.... It isn't as daunting as you might think!.. One trick if you are a sketchy egg cracker (like me) crack one at a time into a cup, and then put all the egg whites together. This way if you are on egg #11 and you break the yolk while separating them, it won't ruin the other 10 egg whites that you just finished separating...

You are going to need a lot of eggs!


Also, make sure that there is absolutely no grease anywhere in your bowl, whisk, spatula and cake pan... I read that if you rub half a lemon on it, it will cut through any grease. I don't know if this is really true, but I did it anyway.

Head over to The Joy of Baking for the recipe, and a video that will make everything seem super-easy (because it is)

Follow me on Instagram - Wlizardbreath

Sunday, May 6, 2012

Birthday Cakes

I'm only 11 days late sharing this with you, but here are my birthday cake(s) that I made this year.

The first one was a few days before my birthday, when I was just really feeling like making a cake. I needed to do some stress-baking, and so I made this:


Carrot Cake from Joy Of Baking


I went home to my parent's house for my actual birthday... And I made the actual birthday cake there. I was going back and forth on which cake to make with my mom, and We did have intentions of doing some fancy decorating, but in the end just wanted to eat it. We would have put my homemade sprinkles on it, but the bright blue, green and pink didn't really go with the taste and flavour... and the brown tint in the icing from all the Coffee. 

The sad thing, is that I only took 2 pictures of my cake... Both on Insta-gram with filters, and nothing really showing the cake. Sorry... It was just so delicious that I forgot t grab my phone to take a picture... my bad.

I ended up going with The Pioneer Woman's Coffee Cake.  I know you are reading that and telling me that coffee cake isn't for birthdays... But THIS coffee cake is just like I imagined when I first heard the term "Coffee Cake"... like the same thing you think when you hear "Chocolate cake".

I found the recipe in Ree's new book, but she also has it on her website... and in a few days I will (try to remember to...) show you my icing recipe.... But seriously, if you love coffee at all... MAKE THIS CAKE!

The only thing I changed was the icing. Which may have been an even bigger hit than the cake itself.


My Birthday was awesome, my parent's got me the pasta roller and fettuccine cutter attachments for my Kitchen Aid... so I've been making a TON of homemade pasta... I even made ravioli!!